Basic Operation: Difference between revisions
No edit summary |
No edit summary |
||
| Line 56: | Line 56: | ||
[[File:Basic6.png|border]] | [[File:Basic6.png|border]] | ||
Export Prefab | === '''Export Prefab''' === | ||
[[File:Basic7.png|border]] | [[File:Basic7.png|border]] | ||
| Line 64: | Line 64: | ||
[[File:Basic8.png|border]] | [[File:Basic8.png|border]] | ||
Generate Thumbnail | === '''Generate Thumbnail''' === | ||
Generate Current View image for Prefab Thumbnail. | |||
[[File:Basic9.png|border]] | [[File:Basic9.png|border]] | ||
| Line 73: | Line 74: | ||
Transforming Objects | == '''Transforming Objects''' == | ||
Manual Transformation | === '''Manual Transformation''' === | ||
You can do '''manual transformation''' through the Transform section of the '''Details''' panel. When you select one or more Objects in the '''Level Viewport''', you can view and edit their '''Location''', '''Rotation''', and '''Scale''' in this section. Where applicable, this section also contains Actor mobility settings. | :You can do '''manual transformation''' through the Transform section of the '''Details''' panel. When you select one or more Objects in the '''Level Viewport''', you can view and edit their '''Location''', '''Rotation''', and '''Scale''' in this section. Where applicable, this section also contains Actor mobility settings. | ||
[[File:Basic11.png|border]] | :[[File:Basic11.png|border]] | ||
Transformation mode Toggling | === '''Transformation mode Toggling''' === | ||
Use the hotkey W/E/R to switch between the three transformation modes: Translation/Rotation/Scale. | :Use the hotkey W/E/R to switch between the three transformation modes: Translation/Rotation/Scale. | ||
[[File:Shortcut bar4.png|border|378x378px]][[File:Basic12.png|border|391x391px]][[File:Basic13.png|border|391x391px]] | :[[File:Shortcut bar4.png|border|378x378px]][[File:Basic12.png|border|391x391px]][[File:Basic13.png|border|391x391px]] | ||
Translation | === '''Translation''' === | ||
:'''Hotkey''': "W". | |||
[[File:Shortcut bar4.png|border|378x378px]] | :[[File:Shortcut bar4.png|border|378x378px]] | ||
The '''Translation''' gizmo is a set of color-coded arrows pointing down the positive direction of each axis in the world. Use it to move an Object along an axis, a plane, or freely. | :The '''Translation''' gizmo is a set of color-coded arrows pointing down the positive direction of each axis in the world. Use it to move an Object along an axis, a plane, or freely. | ||
Click an arrow and drag an arrow to move the selected Object along that axis. | :Click an arrow and drag an arrow to move the selected Object along that axis. | ||
To move an Object along two axes simultaneously, click the square at the point where the two axes meet, then drag to move the Object along the plane defined by the two axes (XY, XZ, or YZ). | :To move an Object along two axes simultaneously, click the square at the point where the two axes meet, then drag to move the Object along the plane defined by the two axes (XY, XZ, or YZ). | ||
To move the Object freely along all three axes, click and drag the white sphere at the point where all three axes intersect. You can also use the mouse wheel to move the Object nearer or farther. | :To move the Object freely along all three axes, click and drag the white sphere at the point where all three axes intersect. You can also use the mouse wheel to move the Object nearer or farther. | ||
:'''Duplicating an Object Using the Translation Gizmo''' | |||
To duplicate an Object, hold down the '''Alt''' key, then click and drag a Translation gizmo arrow. This creates and moves a duplicate of the selected Object, leaving the original unchanged at the starting position. | :To duplicate an Object, hold down the '''Alt''' key, then click and drag a Translation gizmo arrow. This creates and moves a duplicate of the selected Object, leaving the original unchanged at the starting position. | ||
Rotation | === '''Rotation''' === | ||
:'''Hotkey''': E. | |||
[[File:Basic12.png|border|391x391px]] | :[[File:Basic12.png|border|391x391px]] | ||
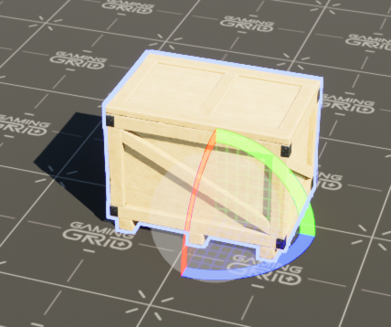
The '''Rotation''' gizmo is a set of three color-coded arcs, each associated with one axis. When you drag one of the arcs, the selected Object rotates around that axis. For this gizmo, the axis affected by any one of the arcs involved is the one perpendicular to the arc. For example, the arc aligned to the XY plane rotates the Object around the Z axis. | :The '''Rotation''' gizmo is a set of three color-coded arcs, each associated with one axis. When you drag one of the arcs, the selected Object rotates around that axis. For this gizmo, the axis affected by any one of the arcs involved is the one perpendicular to the arc. For example, the arc aligned to the XY plane rotates the Object around the Z axis. | ||
[[File:Basic14.png|border|395x395px]] | :[[File:Basic14.png|border|395x395px]] | ||
When you hover the cursor over a particular arc, that arc turns yellow, indicating that you can drag it to rotate the Object. When you start to rotate the Object, the gizmo changes shape to show only the axis around which the Object is being rotated. The amount of rotation is displayed in real time to help you gauge your progress. | :When you hover the cursor over a particular arc, that arc turns yellow, indicating that you can drag it to rotate the Object. When you start to rotate the Object, the gizmo changes shape to show only the axis around which the Object is being rotated. The amount of rotation is displayed in real time to help you gauge your progress. | ||
[[File:Basic15.png|border|398x398px]] | :[[File:Basic15.png|border|398x398px]] | ||
Scale | === '''Scale''' === | ||
:'''Hotkey''': R. | |||
[[File:Basic16.png|border|400x400px]] | :[[File:Basic16.png|border|400x400px]] | ||
The '''Scale''' gizmo has handles that end in cubes. When you drag the gizmo by one of these handles, you scale the selected Object only along the associated axis. The handles are color-coded by axis, similar to the '''Translation''' and '''Rotation''' gizmos. | :The '''Scale''' gizmo has handles that end in cubes. When you drag the gizmo by one of these handles, you scale the selected Object only along the associated axis. The handles are color-coded by axis, similar to the '''Translation''' and '''Rotation''' gizmos. | ||
You can scale an Object along two axes simultaneously in the same way you can use the '''Translation''' gizmo to move an Object along a plane defined by two axes. Each axis is connected to each other axis with a line that forms a triangle. These triangles align with one of the three planes (XY, XZ, YZ). Dragging one of these triangles scales the Object along both axes that define that plane. When the mouse hovers over one of these triangles, the associated handles turn yellow. | :You can scale an Object along two axes simultaneously in the same way you can use the '''Translation''' gizmo to move an Object along a plane defined by two axes. Each axis is connected to each other axis with a line that forms a triangle. These triangles align with one of the three planes (XY, XZ, YZ). Dragging one of these triangles scales the Object along both axes that define that plane. When the mouse hovers over one of these triangles, the associated handles turn yellow. | ||
You can also scale an Object along all three axes, thus maintaining its original proportions. If you hover the cursor over the cube where all three axes meet, all three handles turn yellow. Dragging by that center cube scales the Object proportionally. | :You can also scale an Object along all three axes, thus maintaining its original proportions. If you hover the cursor over the cube where all three axes meet, all three handles turn yellow. Dragging by that center cube scales the Object proportionally. | ||
''' | == '''Widget Bar''' == | ||
[[File:Shortcut bar1.png|border]] | :[[File:Shortcut bar1.png|border]] | ||
Toggle World and Local Space | === '''Toggle World and Local Space''' === | ||
When using the interactive transformation method, you can choose which reference coordinate system you want to use when performing the transformation. This means you can transform the Object in accordance to either: | :When using the interactive transformation method, you can choose which reference coordinate system you want to use when performing the transformation. This means you can transform the Object in accordance to either: | ||
* World space - that is, along the world axes, or | :* World space - that is, along the world axes, or | ||
* The Object's local space - that is, along its local axes. | :* The Object's local space - that is, along its local axes. | ||
The example below shows the difference between world and local space, using a Static Mesh Object. | :The example below shows the difference between world and local space, using a Static Mesh Object. | ||
[[File:Shortcut bar2.png|border]]Local Space | :[[File:Shortcut bar2.png|border]]Local Space | ||
[[File:Basic17.png|border|381x381px]] | :[[File:Basic17.png|border|381x381px]] | ||
[[File:Shortcut bar3.png|border|76x76px]]World Space | :[[File:Shortcut bar3.png|border|76x76px]]World Space | ||
[[File:Basic18.png|border|383x383px]] | :[[File:Basic18.png|border|383x383px]] | ||
Revision as of 11:44, 21 July 2023
Placing Objects
Error creating thumbnail: Unable to save thumbnail to destination
You will select the Objects you want to place from the Content Browser.
Select Objects
Simple Selection
- The most basic method of selecting Objects is to left-click them in the Viewport. Clicking an Object will deselect any currently selected Objects and select the new one instead. If you hold down the Ctrl key while you click a new (unselected) Object, the new Object is added to the selection. If you hold down the Ctrl key while clicking a selected Object, the Object is removed from the selection.
- This method is good for selecting small numbers of Objects or several isolated Objects spread out across a Level, but it can be slow and tedious for selecting large numbers of Objects.
Selecting Objects in the World Outliner
- The World Outliner is a panel in the Editor that contains a hierarchical tree view of all Objects in the level. It is located at the left-hand side of the Editor window.
- You can select and deselect individual Objects in the list the same way you would in the Viewport.
- Hold down the Ctrl key and click multiple Objects to select all of them. The Objects don't have to be in sequence.
Group
Grouping Objects
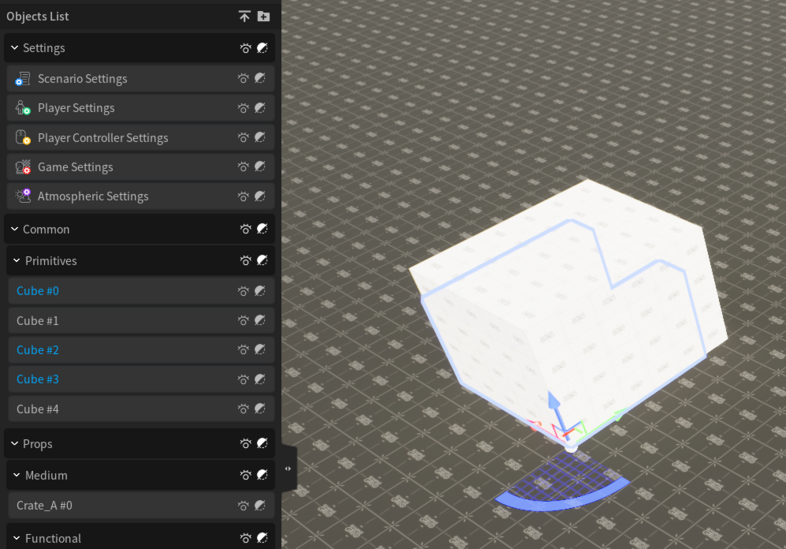
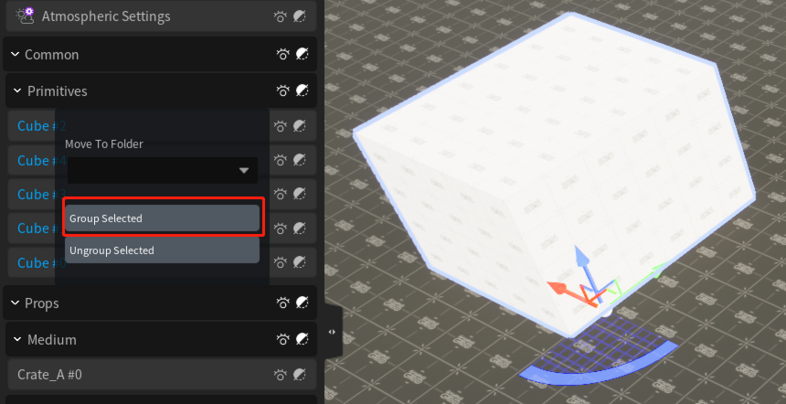
- To group two or more Objects together, select the Objects, then do either of the following:
- Right-click one of the selected Objects to bring up the context menu, then select Group.
- Use the Ctrl + G keyboard shortcut.
Ungrouping
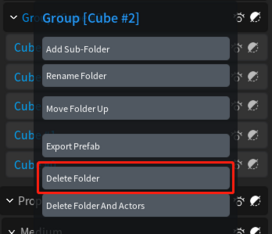
The Ungroup option removes all Objects from the selected groups and deletes the groups.
For groups that are unlocked, the ungroup operation will remove the selected Objects from the group without attempting to keep them within any existing group hierarchy.
 Error creating thumbnail: Unable to save thumbnail to destination
Prefabs
Creating Prefabs
After Group some Objects, you can create a prefab to save the group in local.
Rename the Folder
Error creating thumbnail: Unable to save thumbnail to destination
Export Prefab
Error creating thumbnail: Unable to save thumbnail to destination
The Prefab name will be displayed in Pink.
Error creating thumbnail: Unable to save thumbnail to destination
Generate Thumbnail
Generate Current View image for Prefab Thumbnail.
Error creating thumbnail: Unable to save thumbnail to destination
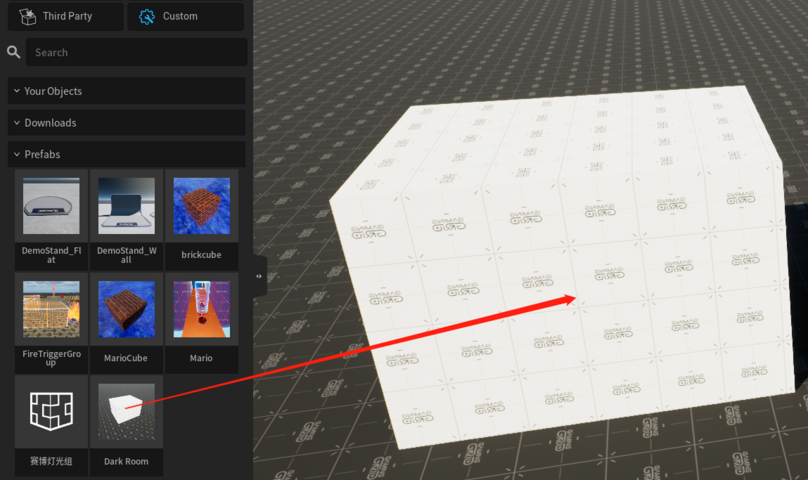
You can see the Prefabs in the "Custom" page. And you can select a new one you want to place from the Browser.
Transforming Objects
Manual Transformation
- You can do manual transformation through the Transform section of the Details panel. When you select one or more Objects in the Level Viewport, you can view and edit their Location, Rotation, and Scale in this section. Where applicable, this section also contains Actor mobility settings.
Transformation mode Toggling
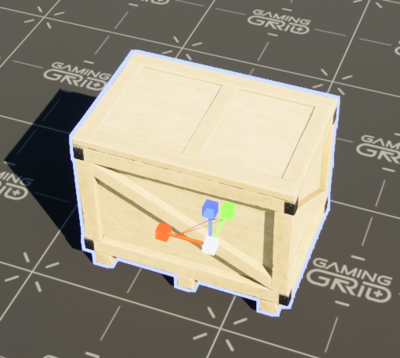
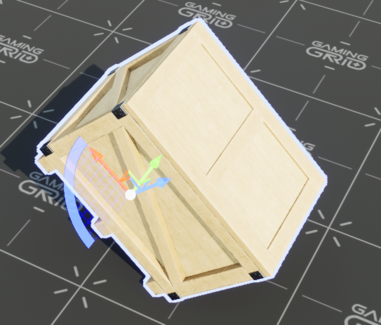
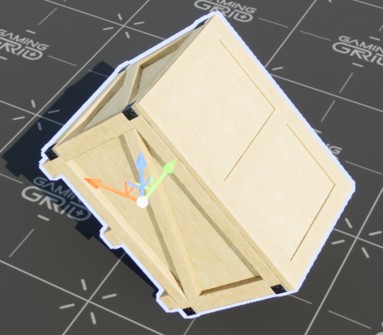
- Use the hotkey W/E/R to switch between the three transformation modes: Translation/Rotation/Scale.
Translation
- Hotkey: "W".
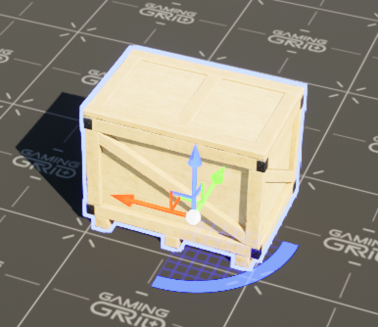
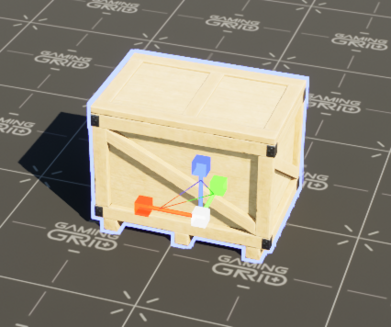
- The Translation gizmo is a set of color-coded arrows pointing down the positive direction of each axis in the world. Use it to move an Object along an axis, a plane, or freely.
- Click an arrow and drag an arrow to move the selected Object along that axis.
- To move an Object along two axes simultaneously, click the square at the point where the two axes meet, then drag to move the Object along the plane defined by the two axes (XY, XZ, or YZ).
- To move the Object freely along all three axes, click and drag the white sphere at the point where all three axes intersect. You can also use the mouse wheel to move the Object nearer or farther.
- Duplicating an Object Using the Translation Gizmo
- To duplicate an Object, hold down the Alt key, then click and drag a Translation gizmo arrow. This creates and moves a duplicate of the selected Object, leaving the original unchanged at the starting position.
Rotation
- Hotkey: E.
- The Rotation gizmo is a set of three color-coded arcs, each associated with one axis. When you drag one of the arcs, the selected Object rotates around that axis. For this gizmo, the axis affected by any one of the arcs involved is the one perpendicular to the arc. For example, the arc aligned to the XY plane rotates the Object around the Z axis.
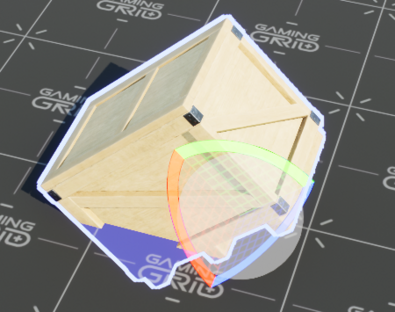
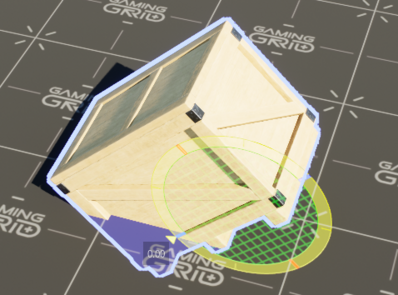
- When you hover the cursor over a particular arc, that arc turns yellow, indicating that you can drag it to rotate the Object. When you start to rotate the Object, the gizmo changes shape to show only the axis around which the Object is being rotated. The amount of rotation is displayed in real time to help you gauge your progress.
Scale
- Hotkey: R.
- The Scale gizmo has handles that end in cubes. When you drag the gizmo by one of these handles, you scale the selected Object only along the associated axis. The handles are color-coded by axis, similar to the Translation and Rotation gizmos.
- You can scale an Object along two axes simultaneously in the same way you can use the Translation gizmo to move an Object along a plane defined by two axes. Each axis is connected to each other axis with a line that forms a triangle. These triangles align with one of the three planes (XY, XZ, YZ). Dragging one of these triangles scales the Object along both axes that define that plane. When the mouse hovers over one of these triangles, the associated handles turn yellow.
- You can also scale an Object along all three axes, thus maintaining its original proportions. If you hover the cursor over the cube where all three axes meet, all three handles turn yellow. Dragging by that center cube scales the Object proportionally.
Widget Bar
Toggle World and Local Space
- When using the interactive transformation method, you can choose which reference coordinate system you want to use when performing the transformation. This means you can transform the Object in accordance to either:
- World space - that is, along the world axes, or
- The Object's local space - that is, along its local axes.
- The example below shows the difference between world and local space, using a Static Mesh Object.
